Thursday, March 22, 2012

Funny Easter Bunny

This Bunny is made with the same Euro paver that the snowman is made with. When I saw the snowman I thought I would try to see how I can turn it into an Easter Bunny. It didn't take long to see how easy it would be. If you liked making the snowman you will also like this project. The brick and be found at most home improvement centers or garden center. All of the other supplies can be found at a craft store, such as Hobby Lobby, Micheal's or your local craft shop.


Supply List
1 Euro Paver brick
White craft paint
White fun foam
Pink fun foam
3 cotton balls 
1 pink pom pom- (smaller than the size of a cotton ball)
1 White Chenille pipe cleaner
Ribbon- Easter or Pastel
Piece of paper- for a pattern
Foam Paint brush
Tacky Glue

First cover your work area with newspaper or an old vinyl table cloth. 

1.Paint the entire brick white and let it dry. You have to paint it two to three times. It just depends on how much the paint soaks into the brick. The nice thing is that craft paint dries quickly and each coat can be done one after another.

2.  Using a piece of paper you will need to make a pattern for the ears. One larger ear and one smaller ear. 

3. The large ear will be cut out of the White fun foam. Cut two white ears.

4. The small ear will be cut out of the Pink fun  Foam. Cut two pink ears.

5. Place the pink ear on top of the white ear and glue together. Be sure to line the bottoms together and center the pink ear in the middle of the white ear.

6. Glue each ear to the back of the brick. Once they are glued on it is easiest to lay the brick on it's back. This will help keep the ears in place while you finish the bunny.

7. Glue on the 2 googly eyes.

8. Cut the white chenille pipe cleaner into 6 pieces. Each piece should be about 1 inches long.

9. Place the 6 chenille pieces where the nose will be. Place 3 on each side to make them look like whiskers. 

10. Glue the pink pom pom on top of the "whiskers" for a nose.

11. Take 2 of the cotton balls and glue them at the bottom of the brick, but on the front. These will be the bunny's feet.

12. Cut a piece of the left over fun foam the size of the bottom base of the brick. Glue this to the bottom. This will keep the brick from scratching any surfaces.

13. Carefully stand up the bunny and glue the last cotton ball on the back of the bunny, at the bottom, for a tail.

14. Wrap the ribbon around the neck and tie a bow or a square knot.

You now have a "Funny Easter Bunny". Enjoy!!


Wash Cloth Easter Bunnies

These bunnies are easy and so much fun. Using an inexpensive, regular facial size wash cloth, the kids can make bunny after bunny to decorate the house and baskets. You can buy the plain white wash cloths but don't be afraid to pick up some of the pastel colors, they look great as Easter bunnies. Make sure you have the thinner, less expensive cloth's like the bundle you can buy for around $4 at WalMart. If the wash cloth is too thick they are a little harder to make look right.

Supply List
Facial size wash cloths, white or pastel
1 cotton ball
2 small googly eyes
1 tiny pink pom pom
Thin Ribbon- Spring Color
Rubber band
Tacky Glue


Lay the wash cloth flat on the table and smooth out.Starting at a corner, tightly roll the wash cloth towards the center and then stop.


Then take the opposite corner and roll to the center.

Take one end and fold in half over to the other end.

Now take the ends and fold in half back towards the fold.

Using the rubber band, wrap tightly around the last fold, to form a head. Two ears should then appear.

Glue the cotton ball onto the back of the bunny.

Glue the 2 googly eyes on the face and the small pink pom pom for the nose.

Tie the thin ribbon around the neck in a bow (to cover the rubber band).


Once you make one bunny you will want to make many more.
Happy Easter!!

Wednesday, February 1, 2012

Finger Weaving (Finger Crocheting)

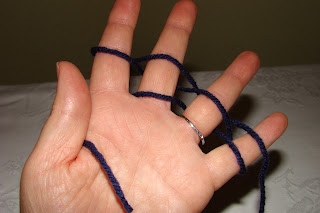
Okay, so this picture doesn't do justice to the fun the kids will have finger weaving, or as some call it, finger crocheting. This is great activity for hand-eye coordination for elementary school age kids. But once they get the hang of it they will have a good time making belts, hair ribbons, snakes and what ever other ideas they can come up with. You don't have to go out and buy new yarn, as I am sure many of you have left over yarn from projects, or maybe ask Grandma if she has any yarn scraps. Kids will have so much fun watching their weaving grow and grow. When they run out of one color just tie on another color. Short ropes can be made for tying hair into pony tails. Measure the waist of the child and have them make a belt for themselves or a sibling. Older kids can string numerous decorative beads onto the yarn before they start and can incorporate them throughout the weaving.

Supplies
Yarn scraps of any color


1. Place the end of the yarn over the palm of your hand between the thumb and pointer finger holding it in place for the first few rounds.


2. Wrap the yarn behind the pointer finger, then over the second finger, behind the third finger, over and around the little finger.


3. Now work back with the yarn, go over the third finger, behind the second finger, and over and around the pointer finger. Each finger will have one row of yarn on it.


4. Then again over the second finger, behind the third finger, over and around the little finger. The first and third finger will have one row and the second and fourth finger will have two rows.


5. Again work back with the yarn, go over the third finger, behind the second finger, and over and around the pointer finger. Each finger will now have two rows of yarn on it.

6. Starting with the pointer finger take the bottom loop of yarn and lift it over the finger to the back. There is now only one loop of yarn on the pointer. Do this to each of the remaining fingers.

7. Weave the yarn behind the pointer finger, then over the second finger, behind the third finger, over and around the little finger. Then work back with the yarn, go over the third finger, behind the second finger, and over and around the pointer finger. You now have two rows on each finger again.

8. Once again starting with the pointer finger take the bottom loop of yarn and lift it over the finger to the back. Do this to all of the fingers.


After a couple of times weaving back and forth you can take the end of yarn that you are holding in your palm and pull on it toward the back. This will lock the weaving in place.

Continue the weaving steps 2-5 over and over until you have the length you want. When you are ready to quit, cut the yarn off of the ball. Take the end of the yarn and slip it through the loop on the finger and remove the loop off of the finger. Then slip the yarn through the second finger, remove the loop from the finger and so on until each loop is off of each finger. Pull on the yarn tight, this will lock the weaving.

Additional ideas
Tie on extra yarn pieces on each end for fringe.
Tie on beads to each end.
Glue on googly eyes and make caterpillars or snakes.

I would love to hear other ideas you come up with.

Tuesday, January 31, 2012

Origami for Kid's


Every year I have offered Origami classes at the elementary schools and every year it is one the favorites with the boys. They ask me all throughout the year when I am holding the origami class. I was planning on including origami projects and instructions here on my blog but it would actually be easier for both you and me if I just give you the sites I use instead. Over the years I have found some really great sites for beginners and they are so well done it doesn't make sense for me to duplicate it. Most craft stores (Michael's, Hobby Lobby, Jo Ann Fabrics) have Origami paper and you get 100 sheets for $4-$6. So here is my list of go to sites for Origami for Kids. At the first one on the list you do not need origami paper, you print the animals on your own printer and then fold. SO EASY AND FUN.

Origami-n-Stuff 4 Kids
www.origami-n-stuff4kids.blogspot.com

Origami Fun (Flowers, Boxes, Animals, Printable, Videos and more)
www.origami-fun.com/origami-for-kids.html

Origami Instructions-Easy
www.origami-instructions.com/origami-for-kids.html

 Origami Resource Center
www.origami-resource-center.com/easy-origami.html

Paper Airplanes and Paper Boats
www.origami-kids.com

Origami You Tube Video's
http://easyorigamiforkids.com/

Activity TV
http://www.activitytv.com/origami-for-kids

Enjoy!


Wednesday, November 23, 2011

Pin Wheel Christmas Tree Ornaments


If you are familar with my Pin Wheel Halloween Wreath, you will see that these ornaments are done the same way. The easiest way to make these is with double sided paper, but with just a little more effort, it can be done with single sided paper as well. 


Supply List

Double Sided Christmas Paper -if possible,
(or single sided Christmas paper see ***)
Buttons
Thin Ribbon- matching color
Glue Stick
Tacky glue


1. You will cut 1- 5 inch squares of the double sided paper for each ornament.

***If you are using single sided paper you will need to cut 2- 5 inch squares for each ornament. Using the glue stick, rub glue along all four sides of the wrong side of one square and place a different patterned paper on top, placing wrong sides together. You will then have one doubled sided square. As you make the pinwheels you will see why you want a different pattern for each side.***

2. Using the picture below and following the black lines, have your child cut the square, from each corner toward the center but do not go completely to the center.


3. Look at the pictures below to see how to form the pinwheels. Using the glue stick, place glue in the center of the paper. Then starting at the bottom left corner, take the corner up to the middle and place in the center of the paper onto the glue. Put more glue on top of the point you just placed in the center and place the next corner in the center of the paper. Place glue in the center before each corner, continue with the next two corners.


4. Place tacky glue in the center and place one button in the middle.


5. Turn the pin wheel over.

6. Cut a piece of matching ribbon long enough to fold in half and use as a hanger for on the tree.

7. Place glue on the back of the pinwheel and place ends of the folded ribbon in to the glue.

8. Let dry. Hang on the tree!

Candy Cane and Icicle Christmas Tree Ornaments


This project is one that my Grandma O. was making more than 20 years ago. Not sure where she found it, but I see you can now buy kits to make these. I prefer to buy everything separately as this is an inexpensive project that the kids enjoy, and will keep them busy for a while. Once the kids are done with these ornaments they will want to make more. All supplies can be purchased at Micheal's, Jo Ann Fabrics, Hobby Lobby or your local craft store.


Candy Cane Supply List

1 Package of White Chenille Pipe Cleaners
Tri Beads- WHITE
Tri Beads- Red or Green

1. Cut the pipe cleaners in half.

2. Place 3 colored beads on the pipe and bend one end of the pipe wire over a bead to prevent them from falling off. Next place 3 white beads on the pipe and move all of the bead to the end. Continue with 3 colored and then 3 white until the pipe is full. Leave a little pipe to bend over a bead at the other end as well.

3. Bend one end over your finger to shape it into a candy cane.

Icicle Supply List

Silver Chenille Pipe Cleaners-1 Package
Paddle Wheel Large Beads (or sunburst) -Clear
Tri Beads Clear
Facet Crystal Beads 8mm-Clear
Facet Crystal  Beads 6mm-Clear
Rondelle Crystal Beads-Clear


For this ornament, we will work from the bottom up. Starting with the Rondelle beads.

1. Place 7 Rondelle beads on the silver pipe cleaner. Bend the very end of the pipe over the last bead to keep them from falling off.

2. Next place 5 of the 6mm crystal Facet beads on the pipe cleaner and push down to the other beads.

3. Place 3 of the 8mm crystal Facet beads on the pipe cleaner.

4. Place 3 Tri beads on the pipe cleaner.

5. And lastly, depending on how much of the pipe cleaner you have left, place 3-4 large Paddle Wheel beads on the pipe cleaner. Making sure to have enough of the silver pipe cleaner showing to bend over your finger for hanging on the tree.

Wintery, Wonderful Snowman


I found this snowman in an old copy of the "Family Fun" magazine. It was only the picture of the snowman along with a group of children who had made them, no instructions. I am not sure if it was a craft from the magazine in a previous issue, or if it was an entry from a family, but I took the picture and just starting winging it. The first thing you must know about this project is that it is made from a paver. In other words, a brick, and it is not the lightest project to do. It is called a "Euro Paver" and can be found at home improvement centers such as Menard's, Home Depot, Lowe's, or most garden centers that also have patio building materials.

The paver looks as if it is two bricks, one brick on top of another, but it is all one piece. The shape of the paver is an octagon shaped bottom, with a square top. You can see this better in the supply picture below.

I hope the children in your life have as much fun with this snowman as did all of the children in my community education classes. This one is a big hit. In the spring I will show you how to make an Easter Bunny using this same type of paver.


Supply List

1 Euro Paver
Silver chenille pipe cleaner
White Paint-indoor/outdoor
Black Paint
Tacky Glue
2- 2 inch pom poms, any color
18 inch piece of Fleece
foam brush
small stencil brush
small art brush
carrot nose, make form orange poly clay or buy one
scrap piece of felt or soft material

***For the carrot nose you can try to find a little carrot at a craft store. (I have found them in the past.) Or you can make carrot noses out of polymer clay. Just take a small amount of the clay, roll into a ball and then roll between your thumb and finger (like a small hot dog) to make a carrot shape. Just keep one end fatter than the other end. Then bake according to the package directions. VERY EASY***


Before you get started cover the working area with newspaper or an old vinyl table cloth.

1. Paint the snowman completely, front, back and sides, with the white paint. The first time you paint it, the paint will soak into the brick. The brick will need to be painted 2-3 times before it looks good and coated well. But don't worry, kids love to paint. Let it dry for about 10-15 minutes between each coat.

2. The white paint will dry fairly quickly and once it is dry it is time to paint the eyes. Lay the snowman flat, making sure the best side is facing up. Using the small stencil brush, (or art brush) and black paint, paint two circles for eyes.

3. With the same brush and black paint, paint three coal buttons down the front of the snowman.

4. Using the small art brush and black paint, make dots to form the shape of a smiling mouth.

5. Cut the chenille pipe cleaner in half. It should reach from one side of the "head" to the other side. This will be the top part of the ear muffs.

6. Keeping the snowman laying flat, glue one end of the chenille pipe cleaner to the side of the head where an ear would be. Then glue one of the pom poms on top of the pipe cleaner. Bend the pipe cleaner over the head and glue pipe to the other side and the last pom pom on top of the pipe. Hold both pom poms for a few minutes until glue has set.

7. Glue on the carrot nose and hold in place for a moment.

8. Using the piece of fleece (approx. 1 1/2 inches wide by 18 inches long) snip both ends about 1 inch long, so that it looks like it has a fringe. Lift the snowman and lay the piece of fleece under the snowman's neck. Wrap around the neck and tie it off to the side.

9. Cut a piece of felt or soft material the same size as the bottom of the paver and glue onto the bottom.
This will keep the paver from scratching the floor or table.

You know have a wintery, wonderful, Snowman for indoors or out.