Thursday, March 22, 2012

Funny Easter Bunny

This Bunny is made with the same Euro paver that the snowman is made with. When I saw the snowman I thought I would try to see how I can turn it into an Easter Bunny. It didn't take long to see how easy it would be. If you liked making the snowman you will also like this project. The brick and be found at most home improvement centers or garden center. All of the other supplies can be found at a craft store, such as Hobby Lobby, Micheal's or your local craft shop.


Supply List
1 Euro Paver brick
White craft paint
White fun foam
Pink fun foam
3 cotton balls 
1 pink pom pom- (smaller than the size of a cotton ball)
1 White Chenille pipe cleaner
Ribbon- Easter or Pastel
Piece of paper- for a pattern
Foam Paint brush
Tacky Glue

First cover your work area with newspaper or an old vinyl table cloth. 

1.Paint the entire brick white and let it dry. You have to paint it two to three times. It just depends on how much the paint soaks into the brick. The nice thing is that craft paint dries quickly and each coat can be done one after another.

2.  Using a piece of paper you will need to make a pattern for the ears. One larger ear and one smaller ear. 

3. The large ear will be cut out of the White fun foam. Cut two white ears.

4. The small ear will be cut out of the Pink fun  Foam. Cut two pink ears.

5. Place the pink ear on top of the white ear and glue together. Be sure to line the bottoms together and center the pink ear in the middle of the white ear.

6. Glue each ear to the back of the brick. Once they are glued on it is easiest to lay the brick on it's back. This will help keep the ears in place while you finish the bunny.

7. Glue on the 2 googly eyes.

8. Cut the white chenille pipe cleaner into 6 pieces. Each piece should be about 1 inches long.

9. Place the 6 chenille pieces where the nose will be. Place 3 on each side to make them look like whiskers. 

10. Glue the pink pom pom on top of the "whiskers" for a nose.

11. Take 2 of the cotton balls and glue them at the bottom of the brick, but on the front. These will be the bunny's feet.

12. Cut a piece of the left over fun foam the size of the bottom base of the brick. Glue this to the bottom. This will keep the brick from scratching any surfaces.

13. Carefully stand up the bunny and glue the last cotton ball on the back of the bunny, at the bottom, for a tail.

14. Wrap the ribbon around the neck and tie a bow or a square knot.

You now have a "Funny Easter Bunny". Enjoy!!


Wash Cloth Easter Bunnies

These bunnies are easy and so much fun. Using an inexpensive, regular facial size wash cloth, the kids can make bunny after bunny to decorate the house and baskets. You can buy the plain white wash cloths but don't be afraid to pick up some of the pastel colors, they look great as Easter bunnies. Make sure you have the thinner, less expensive cloth's like the bundle you can buy for around $4 at WalMart. If the wash cloth is too thick they are a little harder to make look right.

Supply List
Facial size wash cloths, white or pastel
1 cotton ball
2 small googly eyes
1 tiny pink pom pom
Thin Ribbon- Spring Color
Rubber band
Tacky Glue


Lay the wash cloth flat on the table and smooth out.Starting at a corner, tightly roll the wash cloth towards the center and then stop.


Then take the opposite corner and roll to the center.

Take one end and fold in half over to the other end.

Now take the ends and fold in half back towards the fold.

Using the rubber band, wrap tightly around the last fold, to form a head. Two ears should then appear.

Glue the cotton ball onto the back of the bunny.

Glue the 2 googly eyes on the face and the small pink pom pom for the nose.

Tie the thin ribbon around the neck in a bow (to cover the rubber band).


Once you make one bunny you will want to make many more.
Happy Easter!!

Wednesday, February 1, 2012

Finger Weaving (Finger Crocheting)

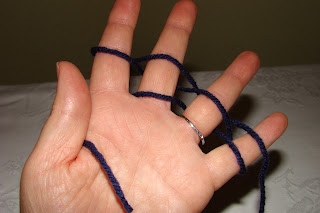
Okay, so this picture doesn't do justice to the fun the kids will have finger weaving, or as some call it, finger crocheting. This is great activity for hand-eye coordination for elementary school age kids. But once they get the hang of it they will have a good time making belts, hair ribbons, snakes and what ever other ideas they can come up with. You don't have to go out and buy new yarn, as I am sure many of you have left over yarn from projects, or maybe ask Grandma if she has any yarn scraps. Kids will have so much fun watching their weaving grow and grow. When they run out of one color just tie on another color. Short ropes can be made for tying hair into pony tails. Measure the waist of the child and have them make a belt for themselves or a sibling. Older kids can string numerous decorative beads onto the yarn before they start and can incorporate them throughout the weaving.

Supplies
Yarn scraps of any color


1. Place the end of the yarn over the palm of your hand between the thumb and pointer finger holding it in place for the first few rounds.


2. Wrap the yarn behind the pointer finger, then over the second finger, behind the third finger, over and around the little finger.


3. Now work back with the yarn, go over the third finger, behind the second finger, and over and around the pointer finger. Each finger will have one row of yarn on it.


4. Then again over the second finger, behind the third finger, over and around the little finger. The first and third finger will have one row and the second and fourth finger will have two rows.


5. Again work back with the yarn, go over the third finger, behind the second finger, and over and around the pointer finger. Each finger will now have two rows of yarn on it.

6. Starting with the pointer finger take the bottom loop of yarn and lift it over the finger to the back. There is now only one loop of yarn on the pointer. Do this to each of the remaining fingers.

7. Weave the yarn behind the pointer finger, then over the second finger, behind the third finger, over and around the little finger. Then work back with the yarn, go over the third finger, behind the second finger, and over and around the pointer finger. You now have two rows on each finger again.

8. Once again starting with the pointer finger take the bottom loop of yarn and lift it over the finger to the back. Do this to all of the fingers.


After a couple of times weaving back and forth you can take the end of yarn that you are holding in your palm and pull on it toward the back. This will lock the weaving in place.

Continue the weaving steps 2-5 over and over until you have the length you want. When you are ready to quit, cut the yarn off of the ball. Take the end of the yarn and slip it through the loop on the finger and remove the loop off of the finger. Then slip the yarn through the second finger, remove the loop from the finger and so on until each loop is off of each finger. Pull on the yarn tight, this will lock the weaving.

Additional ideas
Tie on extra yarn pieces on each end for fringe.
Tie on beads to each end.
Glue on googly eyes and make caterpillars or snakes.

I would love to hear other ideas you come up with.

Tuesday, January 31, 2012

Origami for Kid's


Every year I have offered Origami classes at the elementary schools and every year it is one the favorites with the boys. They ask me all throughout the year when I am holding the origami class. I was planning on including origami projects and instructions here on my blog but it would actually be easier for both you and me if I just give you the sites I use instead. Over the years I have found some really great sites for beginners and they are so well done it doesn't make sense for me to duplicate it. Most craft stores (Michael's, Hobby Lobby, Jo Ann Fabrics) have Origami paper and you get 100 sheets for $4-$6. So here is my list of go to sites for Origami for Kids. At the first one on the list you do not need origami paper, you print the animals on your own printer and then fold. SO EASY AND FUN.

Origami-n-Stuff 4 Kids
www.origami-n-stuff4kids.blogspot.com

Origami Fun (Flowers, Boxes, Animals, Printable, Videos and more)
www.origami-fun.com/origami-for-kids.html

Origami Instructions-Easy
www.origami-instructions.com/origami-for-kids.html

 Origami Resource Center
www.origami-resource-center.com/easy-origami.html

Paper Airplanes and Paper Boats
www.origami-kids.com

Origami You Tube Video's
http://easyorigamiforkids.com/

Activity TV
http://www.activitytv.com/origami-for-kids

Enjoy!